Cupola Connect · Current beta

A guide for every parish role.

Privacy Policy: participation, settings, and data choices →

From visiting your first Bible study to managing a parish: find the steps, permissions, and troubleshooting help you need.

28 guides

Getting startedLink to guide ↗

How Cupola Connect works

Parishioners find and join their parish without a personal account. Parish teams maintain its information, resources and announcements in one portal.

  1. Install the app and follow its short welcome walkthrough.
  2. Choose Find my Parish, search by name or location, and tap Join.
  3. Use Calendar when available, Readings, and More for parish resources and Settings.
What to know

Parish registration is free during the current beta. Only administrators and invited staff need verified email accounts.

Back to search ↑
Getting startedLink to guide ↗

Install and open the app

The current iOS beta is distributed through TestFlight invitations. Install the invited build, then find and join your parish.

  1. Open the TestFlight invitation supplied by your release administrator and install the current build.
  2. Launch the app and complete the welcome walkthrough.
  3. Confirm the parish name and location after joining.
What to know

Ask your parish or pilot coordinator for an invitation. A public App Store release has not been announced.

Back to search ↑
Getting startedLink to guide ↗

Join without a personal account

Join your parish without an email or password. Your parish choices and settings are remembered on this app installation.

  1. Tap Find my Parish from the welcome screen.
  2. Search the public catalogue and check the parish name and location.
  3. Tap Join. You can browse content without enabling phone notifications.
What to know

No administrator approves ordinary joins. Reinstalling or changing phones may require joining again.

Back to search ↑
Getting startedLink to guide ↗

Find, switch or leave a parish

Your joined parishes and notification choices are separate for every parish on this installation.

  1. Open the parish selector in Settings or More.
  2. Type to filter My Parishes and search other available parishes.
  3. Choose a joined parish to switch, or join a new search result.
  4. Use Leave in Settings to remove participation and stop that parish’s pushes.
What to know

Leaving does not cancel a parish subscription or delete an administrator account.

Back to search ↑
Using the appLink to guide ↗

Use Settings

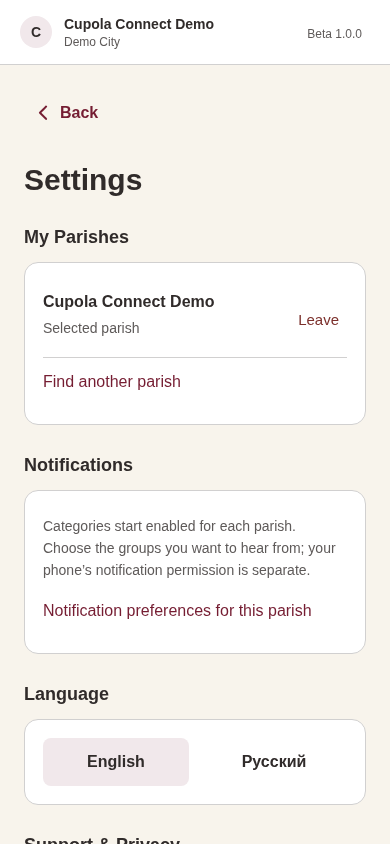
Settings brings together your joined parishes, notification choices, language, privacy information and help.

  1. Open More → Settings.
  2. Review your joined parishes and the currently selected parish.
  3. Change supported language and notification preferences, or open privacy/help options.
Back to search ↑
Using the appLink to guide ↗

Use the parish calendar

Calendar appears only when enabled and its configured source loads successfully; an empty valid calendar remains visible.

  1. Open Calendar when its tab is available.
  2. Review service dates, locations and supplied meeting links.
  3. Refresh to fetch changes. A successful empty response says No events scheduled.
What to know

An invalid API key, disabled calendar or source failure hides the tab. Readings and More remain available.

Back to search ↑
Using the appLink to guide ↗

Read daily Orthodox content

Readings shows scripture and commemorations from the supported source, including source attribution and honest unavailable states.

  1. Open Readings and choose today or another date.
  2. Tap a scripture or saint entry for details.
  3. Use narration where available, or retry a failed source request.
What to know

The app does not fabricate missing reading content. Device voices and source availability vary.

Back to search ↑
Using the appLink to guide ↗

Find clergy and important contacts

Published clergy and parish contact information is accessible without personal accounts; only authorized staff can edit it.

  1. Open More → Parish → Clergy.
  2. Open Important Contacts directly below Clergy for parish staff such as the treasurer.
  3. Tap a supplied phone, email or website link to contact them.
Back to search ↑
Using the appLink to guide ↗

Complete a parish form

One Forms list displays published parish forms. Supported metadata is rendered in the app, with an external-provider fallback for unsupported questions.

  1. Join the parish and open More → Parish → Forms.
  2. Choose a form, complete supported questions and submit once.
  3. For a form marked Open on website, continue with its provider.
What to know

After a submission timeout, ask the parish before resubmitting. Draft and archived forms are not public.

Back to search ↑
Using the appLink to guide ↗

Donate directly to your parish

Donations appears only when the selected parish enables it and supplies valid HTTPS donation links.

  1. Open More → Parish → Donations when present.
  2. Choose the parish’s PayPal, Tithe.ly or other configured provider.
  3. Complete your donation with the provider and retain its receipt.
What to know

Donations are separate from Cupola Connect subscription billing. Donation providers and parishes handle their own payments and data.

Back to search ↑
Using the appLink to guide ↗

Choose notification categories

All active parish categories start enabled. Choose the updates you want and allow notifications in your phone settings.

  1. After joining, enable notifications on this phone when ready.
  2. Open Settings → Notification preferences for the selected parish.
  3. Turn off categories you do not want, such as Church School or Brotherhood, and save.
What to know

New categories default to enabled. Preferences do not copy between parishes. Re-enabling OS permission may require registering the phone again.

Back to search ↑
Privacy & supportLink to guide ↗

Reset app participation

An installation reset removes this installation’s joined parishes and push registrations; it does not erase another phone or an administrator account.

  1. Open Settings and review the reset/forget participation option.
  2. Confirm the operation while online so backend subscriptions can be removed.
  3. Complete the welcome flow again to join a parish.
What to know

Uninstalling alone may leave provider registrations until invalid tokens are retired. Use the app’s leave/reset action when possible.

Back to search ↑
Parish administrationLink to guide ↗

Sign in as an administrator or staff member

Only parish administrators and invited staff need verified email accounts. Ordinary participation never grants management access.

  1. Open the portal or the app’s Administrator sign-in entry.
  2. Sign in with your verified administrative email and password.
  3. Choose a parish you are authorized to manage.
What to know

Staff corresponds to the stored editor role. Owner access is reserved for the platform operator.

Back to search ↑
Subscriptions & registrationLink to guide ↗

Register a parish

During the open beta, a verified administrator can register and configure a parish without payment. The future Starter/Pro tiers are prepared but billing is deferred.

  1. Open the portal registration page, create an administrative account and verify its email.
  2. Enter the parish name and unique identifier and confirm authorization to represent it. Optionally enter a mission/pilot code.
  3. Complete required configuration; the backend publishes the parish automatically once ready.
  4. Confirm the portal says billing deferred / open beta. No card or payment provider is required.
What to know

Billing activation later requires owner configuration and an explicit subscription checkout; no parish is charged automatically.

Back to search ↑
Subscriptions & registrationLink to guide ↗

Understand beta access and planned parish pricing

Parish registration is free during beta. Starter at $10/month and Pro at $19.99/month are planned subscriptions; guided setup is a separate optional service.

  1. Use your parish workspace free during the current beta. No subscription payment is required.
  2. Visit Parish Plans for future Starter and Pro pricing; the website does not currently collect a subscription payment.
  3. Choose free self-service setup or request optional guided setup for $200 one time. Your request does not authorize a charge.
What to know

Moving from beta to a paid subscription will require a clear activation choice. Owner-authorized mission exemptions can continue when subscriptions launch.

Back to search ↑
Subscriptions & registrationLink to guide ↗

Request guided parish setup

Free self-service setup remains available. Optional guided setup costs $200 one time and includes configuration, training, a phone notification check, a quick-start guide and one follow-up.

  1. Open Guided Setup from the website footer or Parish Plans page and review the included service.
  2. Enter your contact name, email, parish and any useful context in the private request form. Do not include passwords or payment details.
  3. Acknowledge the one-time fee and submit your inquiry. No session is booked and no payment is taken by the form.
  4. Wait for personal follow-up to agree on the scope, timing and payment arrangements before the service begins.
What to know

The $200 service is separate from future monthly subscriptions. You may continue configuring your parish yourself at no setup charge.

Back to search ↑
Subscriptions & registrationLink to guide ↗

Register an exempt mission parish

The platform owner can provide a single-use code for an authorized mission, pilot or other exempt parish; parish admins cannot waive their own bills.

  1. Request a free-registration code from the platform owner or your authorized diocesan contact for a permanent mission exemption.
  2. Register using your verified administrative email and enter the code.
  3. Complete required configuration and confirm the portal shows exempt status.
What to know

Codes may expire or be restricted to a parish or email. Do not publish them. Exempt parishes receive Pro-level announcement access without subscription payment.

What to know

During open beta, registration is already free; a mission exemption records eligibility for continued free access after billing activation.

Back to search ↑
Parish administrationLink to guide ↗

Configure parish identity and branding

Configuration is scoped to the selected parish and covers its identity, contact details, colors, public calendar and optional resources.

  1. Choose the correct parish in Portal → Configuration.
  2. Enter the required parish name and location/contact information and supported languages.
  3. Configure colors and optional content, save, and check the public preview or app.
What to know

Existing in-app screens refresh tenant configuration; native Cupola Connect icon/splash changes require rebuilding.

Back to search ↑
Parish administrationLink to guide ↗

Configure Google Calendar

Enable Calendar and provide a public Google Calendar API key and calendar ID. The app shows its tab after a successful load.

  1. Make the intended calendar publicly readable and obtain its calendar ID.
  2. Enter its key and ID in Configuration and enable Calendar.
  3. Save, then verify a real event or a successful No events scheduled result in the app.
What to know

Use appropriate API restrictions. The application cannot make a private calendar publicly readable merely by entering its ID.

Back to search ↑
Parish administrationLink to guide ↗

Manage notification categories

Each parish defines its categories; inactive categories are omitted from recipients’ controls and cannot be selected for new sends.

  1. Open Configuration and review the category list.
  2. Add a stable category identifier and a readable label or disable an unused category.
  3. Save and check that the announcement composer and app preferences reflect the change.
What to know

Renaming a label preserves preferences when the identifier stays the same. New identifiers default to enabled for joined installations.

Back to search ↑
Parish administrationLink to guide ↗

Send a targeted announcement

Only authorized parish staff can send, and recipients must have joined that same parish with the selected category enabled.

  1. Open Notifications and choose an active category.
  2. Enter the title/body and review the preview and allowance before confirming.
  3. Send once and inspect campaign history and receipt results.
What to know

Submitted is not proof a notification was displayed. Never send again with a new identifier after an uncertain timeout without reviewing history. Scheduled announcements are not implemented in this release.

Back to search ↑
Parish administrationLink to guide ↗

Manage clergy and photos

Authorized parish staff can maintain clergy information and photos from the portal or app administration tools.

  1. Open Clergy, add a record or select one to edit.
  2. Enter its published contact details and choose a supported image when desired.
  3. Save and verify the card in the app.
What to know

A storage/IAM error requires infrastructure correction, not resetting parish data.

Back to search ↑
Parish administrationLink to guide ↗

Manage important parish contacts

Staff contacts are published separately from clergy and include parish roles such as treasurer, bookstore keeper and school contact.

  1. Open Important Contacts in the portal.
  2. Add or edit the display name, role and intended public contact information.
  3. Save or deactivate the record, then check More in the app.
Back to search ↑
Parish administrationLink to guide ↗

Publish and maintain forms

The portal maintains one published forms catalogue per parish, with metadata rendering supported by the configured backend.

  1. Open Forms and add a title, description and provider URL.
  2. Keep incomplete forms in Draft; publish when the link and intended questions work.
  3. Test from the app and archive forms that are no longer needed.
Back to search ↑
Parish administrationLink to guide ↗

Configure donation links

A parish can offer several external donation options; blank or disabled configuration never creates an empty app navigation entry.

  1. Open Configuration → Donations.
  2. Enable the section and add labels with valid HTTPS links to the intended parish providers.
  3. Save and test each link from the selected parish in the app.
What to know

Do not paste provider credentials. These links do not change the parish’s Cupola Connect subscription.

Back to search ↑
Parish administrationLink to guide ↗

Invite administrators and staff

Privileged roles are assigned through invitations tied to verified email identities, never by an anonymous installation ID.

  1. Open Team and enter the intended person’s email and admin or staff role.
  2. Share the generated invitation securely with that person.
  3. They sign in with that verified email and accept before management access appears.
What to know

Parish admins cannot grant platform owner access or permissions for another parish. Review and revoke invitations or team access when it is no longer needed.

Back to search ↑
Privacy & supportLink to guide ↗

Understand privacy and diagnostics

Ordinary users provide installation participation and preferences, while administrative accounts and parish subscriptions carry separate personal and billing information.

  1. Open Settings → Privacy for the current policy.
  2. Review notification and optional diagnostic preferences.
  3. Use the private problem-report flow for platform questions, avoiding sensitive screenshots.
What to know

Historic directory records are preserved but unavailable through the active app/API; retention or deletion requests are handled separately.

Back to search ↑
Privacy & supportLink to guide ↗

Resolve common app and portal problems

Start with your connection, selected parish and phone settings. Report any persistent problem privately so we can help.

  1. If Join fails, check your connection, refresh parish search and try again.
  2. If notifications are missing, confirm the parish is joined, the category is enabled, and your phone allows notifications for Cupola Connect.
  3. For a missing calendar or outdated parish information, contact your parish administrator. For portal sign-in, verify your email and use the invited address.
  4. Use More → Settings → Help / Report a problem to share the screen, error and steps. Include screenshots only after removing private details.
Back to search ↑
See it in practice

Join a parish in half a minute.

This short recording shows the current app’s welcome screens, parish search, joining and notification preferences. It uses synthetic Demo data in a web preview; phone layouts and native permission prompts may differ.

No personal account is needed to join. Your installation remembers your choices separately for each parish.

Read the walkthrough
  1. Continue through the introduction and choose Find my Parish.
  2. Type a parish name, review the result and tap Join.
  3. Open More to find the parish’s published resources.
  4. Open App Settings → Notification preferences for this parish.
  5. Turn off any categories you do not want, then Save preferences. New active categories start enabled.

Device notification permission is requested separately in a native build. This preview does not demonstrate push delivery.

How to install the beta → · Read the joining guide →

32-second silent walkthrough · Synthetic Demo parish
Visual guide

See the app and portal

These images use synthetic preview data. They illustrate the interface and contain no actual participant or administrative account records. Device layouts may vary.

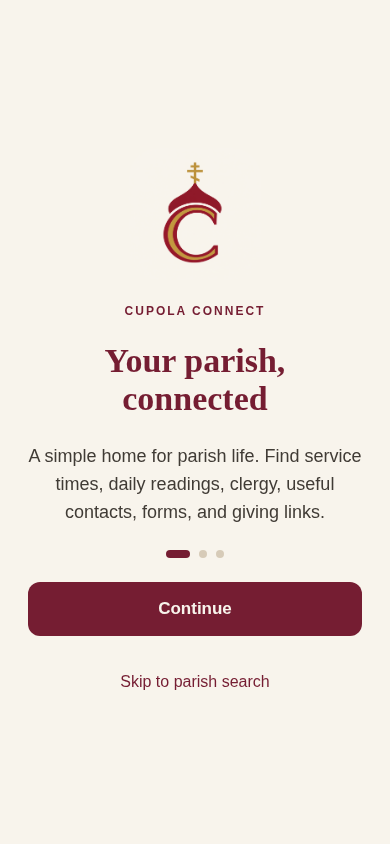
Welcome and find your parish

A short introduction leads to parish search and Join without an account.

Parish and notification settings

Participation and category preferences belong to this installation, separately for each parish.

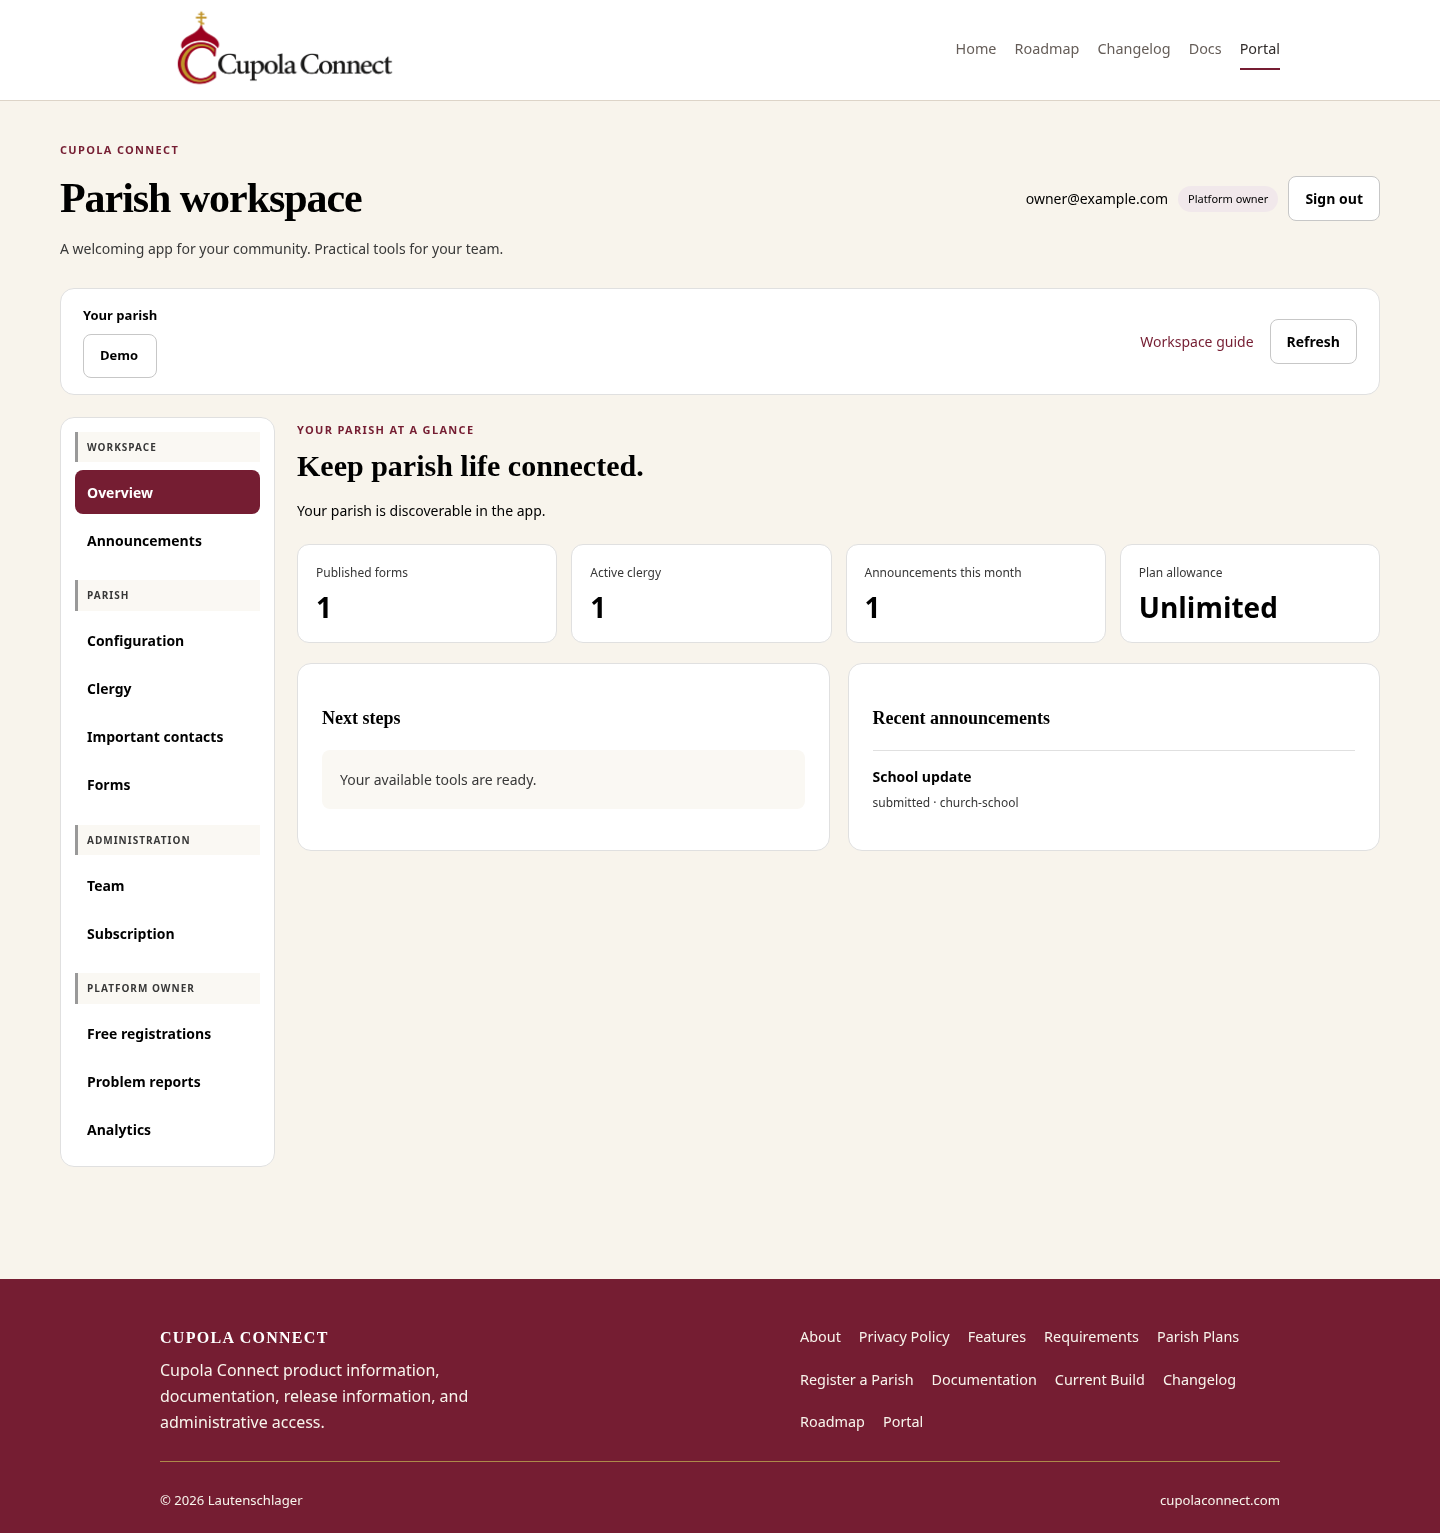
Parish administration

Authorized staff manage content; admins manage team and configuration. Billing remains deferred during beta.

Still need help?

Use More → Settings → Help / Report a problem in the app to send a private report. For pastoral questions, use your parish’s published contact information. If your team wants help getting started, explore guided setup.

Contact Cupola Connect → · Beta installation guide →